
IMMERSIVE AUDIO: AMBISONICS AND DAW PLUGINS
- Vanesa Paris

- 30 ene 2020
- 11 min de lectura
This is a paper from my Master's studies submitted in my subject of Immersive Audio taught by Tim Schemele and Toni Farran, from the Eurocat Project in Barcelona. The purpose of this research and testing essay is to get introduced to the world of the Ambisonics and the plugins to be used in audio DAWs that are available nowadays.
I will explain what Ambisonics is, some terms related, and a summary of how it works. I will then explain how encoders and decoders and other plugins work in DAWs with Ambisonics audio by giving examples of myself testing some of the free plugins in the DAW Reaper. At the end I will provide an annex with many brands of plugins I have encountered during my research and will describe some of their main characteristics.
I think that this basic guide on the topic, and the list of plugins (many of them free), may be useful for anyone interested in getting started with Ambisonics in an easy and inexpensive way. Hope you enjoy it.

WHAT IS AMBISONICS?
Ambisonics is a method of recording, mixing and playing back atmospheric 3D sound: sound that surrounds you not only at any horizontal point around your ears, but also in a vertical axis. There is more control over clarity, richness, detail, and depth and you can make individual sounds feel louder or quieter, more diffused or more focused, bigger or smaller, etc. Every sound has its own personality and sounds around you as in the real world would do because, rather than being constrained to channels, sounds can be precisely placed and moved in the three-dimensional space.
The development of Ambisonics began in the 1970s. There was a lot of research work by using measured Head Related Transfer Function (HRTF) filters to simulate the acoustic properties of the real 3D sound that our ears hear. Also, by specifying the relationship and conversions from and to other surround systems in order to improve the Ambisonics system. However, it was not until the VR industry required it more and more, that it was commercially adopted. Now that the availability of fast and low-cost digital processing, combined with not that expensive (or sometimes even free) available digital production tools, makes it easy to produce Ambisonic content.
The Ambisonics content can be decoded for a wide variety of speaker numbers, arrays and layouts, but also to the binaural experience with headphones, which allows to configure the listening environment in a way that best suits the requirements without compromising the quality of the reproduction in any case.
It is nowadays widely used in video games, cinemas, home theatre systems, mobile apps, etc. Dolby Atmos, Auro 3D, Facebook 360, Google, among many other brands and platforms, are already using it. The sound is precise and immersive almost as the real one, and accompanies your 2D/3D visuals or just stands on its own, and considerably improves your audience’s experience, either it is an interactive or a linear virtual reality experience.
HOW DOES AMBISONICS WORK?
Ambisonics content is recorded with sound field microphones that have four or more cardioid capsules encased together. These raw recordings, referred to as A-format, are then processed into a matrix of four channels. Once we have these four channels, which are named W, X, Y and Z, then we can say that we have transformed the A-format into the B-format.

(Pic 1) An Ambisonics Microphone of 4 channels, also called Tetrahedral Array
(picture taken at the Eurocat's studio in Barcelona)

(Pic 2) An Ambisonics higher-order multi-capsule microphone of 32 channels
(picture taken at the Eurocat's studio in Barcelona)
However, recording A-format is very expensive and technically can be very difficult and complex to do. Good news is that B-format can also be encoded, or synthesized, out of regular audio recordings, mono, stereo or multi-channel (5.1 or 7.1). This can be achieved with plugins with controls which allow you to position each element in the sound field. I will be mentioning and describing some of them in the next sections.
The W channel is an omni-directional polar pattern, containing all sounds in the sphere, coming from all directions at equal gain and phase. The X one is a figure-8 bi-directional polar pattern pointing forward, the Y one is a figure-8 bi-directional polar pattern pointing to the left, and the Z one is a figure-8 bi-directional polar pattern pointing up.
Depending on how we combine these four channels when working with them, we can differentiate between two different B Format standards: The Ambix and the Furse-Malham conventions. The Ambix one follows the order WYZX, and is a modern standard that has been widely adopted by distribution platforms such as YouTube. The Furse-Malham (or also called FuMa) is an older standard that is still supported by a variety of plug-ins and other ambisonic processing tools.

(Pic 3) Screenshot of the Ambeo Plugin “A-B Converter” by Sennheiser that is used to convert A-format into B-format audio. As you can see, it allows you to set it into FuMa or Ambix order.
This 4 channel B-format can be extended to higher spatial resolutions (Higher Order Ambisonics or HOA). A HOA encoded sound field requires (𝑀+1)2 channels to represent the scene, e.g four channels for 1st-Order, nine for 2nd-Order, sixteen for 3rd-Order, etc. In fact there are brands that already sell you different Ambisonics plugins depending on the High Order you need to work with, as it happens with the aX Suite 1st/2nd/3rd Order plugins by the brand SSA Plugins. To play a 7th-Order mix with speakers, we would need in fact a system of 64 units, something that is rarely found in any studio. However, it is worth working with such a Higher Order because it means more control of the atmospheric sound and, in fact, it can be enjoyed in a more affordable way which is with headphones when decoded to a binaural 3D format.

(Pic 4) Output channels in our DAW or Speakers needed for every High Order
DAWS PREPARED TO WORK WITH AMBISONICS
Many Ambisonics plugins are available in VST, AAX and AU format for 32- and 64-bit Windows and Mac OS X. They support DAWs with surround sound capabilities, i.e. Reaper, Nuendo, Pro Tools HD etc.
However, not all DAWs convert your work into any Ambisonics Order file, because there are very few that allow you to support many channels per track. Reaper allows you to have up to 64 channel outputs, which allows you to work up to 7th-Order Ambisonics audio. It is the DAW mostly used because of this and because it is very unexpensive.
Pro Tools, which is the standard DAW in the music industry, only lets you work with Ambisonics with their Ultimate version, the most expensive one, and only until the 3rd-Order, because it only allows you to have up to 32 channel outputs, unless you use it along with Avid MADI Protocol hardware to have 64 outputs, or along with Pro Tools HDX hardware, which lets you work with 192 outputs.

(Pic 5) Screenshot of the outputs allowed in Pro Tools Ultimate
Nuendo supports Ambisonics up to the third order and not only for mixing but also recording from Ambisonics-capable microphone systems. It also has its own plugins such as its internal VST Ambisonics Panner to create an Ambisonics mix from mono, stereo or surround sources. It also has its own plugins to do Headtracking and to decode, with its VST Ambi Decoder, although you can use many of the other external Ambisonics plugins mentioned in this essay, especially the DearVR ones, which are very compatible. Cubase is similar to Nuendo, being up to the third order and having its own plugins apart from using any other third party ones: the VST MultiPanner, the VST Ambi decoder and the VST Ambi converter.
In order to really learn that I was working with Ambisonics material for this research essay, the only program I was able to test was Reaper, since it is the cheapest and more flexible one I found. Then, I looked for banks such as www.ambisonia.com, to find .amb files, which are audio files that have been recorded with ambisonics microphones and have four or more channels. There are also other formats such as .wav, .aiff or .flac files that can hold more than two channels. I loaded some into reaper to see how a track can actually hold more than two channels:

(Pic 6) Example of a 1st-Order free recording with a tetrahedral microphone I found in: http://ambisonia.com/Members/pwhodges/ambisonicfile.2009-09-16.6872608699/
There exists a solution to the limitations of the number of channels of the DAWs. That is to create the channels virtually into the computer so it thinks it has up to 64 channels. In Mac it is done by creating an aggregate, which is a mix of your internal or external soundcard and an app such as the Soundflower one. This would allow to work with Ambisonics in a limited program such as Ableton. Sfear Plugins are recommended to be used with this app so they can be used in any DAW.

(Pic 7) Screenshot of the Sound Devices section of Mac when Soundflower is installed and aggregated.
ENCODING INTO B-Format AMBISONICS FROM DIFFERENT AUDIO FORMATS
To encode is to process A-format Ambisonics into B-format, and the Ambeo A-B Converter by Sennheiser is an example of a plugin that only does that. If you are not working with Ambisonics recordings, then to encode means to take mono or stereo audio and put it through a program or plugin that makes it possible to pan it as if it had been recorded with sound field Ambisonics microphones. If such audio is not encoded, you cannot spatialise it further than a normal stereo panner would let you. You can also encode other formats such as a 5.1 or a 7.1 file into Ambisonics for other more complex purposes, such as for example to rearrange the channels of the file or mix them differently. The ATK FOA Encode Omni would be an encoder plugin that could make that.
There are many Encoders available that have different functions. I you are working with files that are already B-format, you may use an Encoder that makes the file a higher order than it is if you want, by using an SSA Panner that makes you upmix it up to 7th-order. However, the most normal use of an encoder is to take mono or stereo usual files to be able to work with them in an Ambisonics way, or to add them to a mix in which you have Ambisonics recordings but you need extra sounds you have not been able to record in such a way.
For this essay, I tried some of the free plugins from all the ones I have listed at the end of this post. That list is not at all complete, but it has some of the most known brands that sell them, or developers that care enough to create them and give them for free for people to be able to work with 3D audio in an inexpensive way.
The first one I tried was the Ambeo Orbit by Sennheiser, but noticed I did not need a decoder to hear the spatial changes. In fact, when putting a decoder, it did not work properly. Therefore, it is a plugin that can be used in any DAW, even if it cannot be rendered as an Ambisonics file later on, only as a stereo file. In a program such as Reaper (or the others mentioned before with multiple output channels) you can see below how I was trying to render the mono file into 8 channels, but only the first two channels were used, even though I made many automations in the azimuth and the elevation features:

(Pic 8) Screenshot of my testing the Ambeo Orbit by Sennheiser with Reaper and finding it only renders into two channels.
The DAW Logic Pro X has its own plugin called Surround Panner which works in a similar way to the Ambeo Orbit, and lets you manage surround panning. In fact, this DAW lets you record and import Ambisonics files, but having to use a track for each channel:

(Pic 9) Screenshot of a 1st-Order Ambisonics audio split into four channels and the Surround Panner plugin in Logic Pro X.
However, when working with ATK for Reaper, it was necessary to put a decoder in the Master channel in order to hear the spatial changes when I moved the azimuth and the elevation settings of the encoder. I explain what a decoder is in the next chapter. Working with these ATK plugins, I was able to render the mono file into eight channels track successfully, although only the four first ones were actually used, because the ATK for Reaper plugins are only 1st-order:

(Pic 10) Screenshot of my testing the ATK FOA Encode Planewave with Reaper and finding it is able to render into 1st-order Ambisonics.
There are some plugins brands that allow you to have a device that you put in front of you and is connected by Bluetooth to the computer, so the spatial changes you create are done with the movement of your head. This feature, called Headtracking, can be included already in the encoder, as in the case of the Waves decoder Nx Virtual Mix Room, or to be an individual plugin, such as the SSA aXRotate. An alternative to the device, is to have a camera in your computer that reads your head movements. This is very useful when working on videogames or any other kind of experiences in order to include virtual reality sound effects. I was not able to experiment with Headtracking myself because I did not have neither a device nor a computer camera.
DECODING THE B-Format AMBISONICS INTO DIFFERENT AUDIO FORMATS
To decode is to convert the B-format audio into loudspeakers signal (into a speakers array) or into binaural 3D audio for headphone listening. You can therefore turn your audio into the standard surround and 3D surround formats used in film and television, such as Dolby Atmos, IMAX or Auro 3D, and into binaural stereo or Higher-order AmbiX for VR and AR applications.
If you have a DAW that allows you to have many outputs, no special plugin is needed to render your signal into the final audio file that keeps the B-format Ambisonics characteristics. However, you need a plugin to render your B-format into binaural signal if what you want is to render the Ambisonics audio so it can be listened to through headphones, stereo loudspeakers or another speaker array format that is different from the one you have been working with in your program (i.e. you have been working with 3rd-Order Ambisonics and you want to turn it into the 5.1 surround system without losing quality).
It is basic that a decoder is used during the production time in order to monitor your work through headphones. If I had not had a decoder while testing audio files in Reaper, i.e. the ATK Decode Binaural (shown in the following pictures K and L), I would not have been able to hear any spatial difference between the elements, not even with the .amb audio files.

(Pic 11) Screenshot of the different ATK Decoders depending on the layout you want.

(Pic 12) Screenshot of the different HRTF filters that the ATK Binaural Decoder lets you choose from.

(Pic 13) Screenshot of the Inputs and Outputs available in the Ambi Micro plugin by DearVR

(Pic 14) In this screenshot I was comparing the different decodings given by ATK and DearVR for binaural audio. They all decode slightly different because they take into account different HRTF filters.
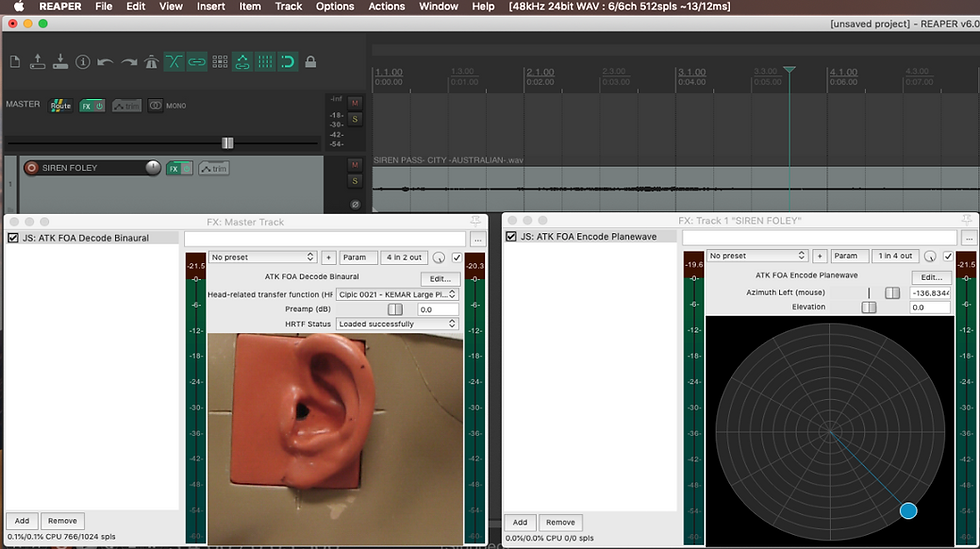
(Pic 15) As you can see in this screenshot, and as I mentioned in the previous chapter, you need a decoder in the master track (plugin on the left in the case of wanting a binaural decoder), and an encoder in the track where I have my mono (or whatever format audio file I would like to work with) audio file (plugin on the right).
(Pic 16) In this screenshot you can see the same as in the previous screenshot (an encoder - spatialise - on the left, and a decoder - converter - on the right), but in here I was experimenting with the 360 Audio Plugins that are provided by Facebook to create FB360 audio for 360 videos.
The last thing you want to do once you have made all the spatial changes to your audio files, is to render them. In many tutorials you find that they say that you first remove the decoder from your mix before rendering. That is because it is probable that you are using a binaural decoder and the purpose is to create an .amb file. If you do not remove the decoder, you just get to use the first two channels and you get a result similar to this:

It just makes no sense to have four channels and only use two. In order to use the four channels (or any number of channels you need to use), you need to remove the decoder and then render it. But if you want to load it again into the DAW and listen to it properly, you need to activate a binaural decoder again:

However, if your intention is to render your audio into a stereo file, you need to render it with the binaural decoder activated, otherwise, the spatial changes will be heard strange and not what you wanted when working with your audio. When you load the stereo rendered file back into the DAW again, you do not need a decoder at all to play it and, in fact, if you activated it, you would ruin the spatial changes:

PLUGINS TO WORK WITH AMBISONICS IN DAWS (Third party Plugins)
There are many more brands and developers that work with Ambisonics and have or will release new plugins in the future, so the following is just a sample of the variety of options that we can find nowadays.


The Sfear plugins are nowadays used only in academic situations, and I listed them because I was able to use them during my Master's studies. I hope they can be released for anyone soon.


Comentarios